

How To Make A Template In Word 2021
This article offers advanced Microsoft Word (2010-2013) techniques for creating a protected template with fillable fields (or "Content Controls" in Microsoft terminology) for data that cannot exist completed past Clio's merge field tags. These techniques would be useful for creating protected trust receipts with Document Automation.
Related article: Tutorial - Using Document Automation to Create a Trust Receipt
If yous are not familiar with Document Automation, please meet the following back up manufactures:
Using Clio's Document Automation
How to Create a Certificate Template
Contents
Showing the Developer Tab
Adding Course Controls
Control Backdrop
Formatting Class Controls
Calculation Editing Restrictions/Protection to your Template
Advanced Document Automation Webinar
Showing the Programmer Tab
The tools that you will need to add together form controls to your template tin be plant in the Programmer tab which is hidden by default.
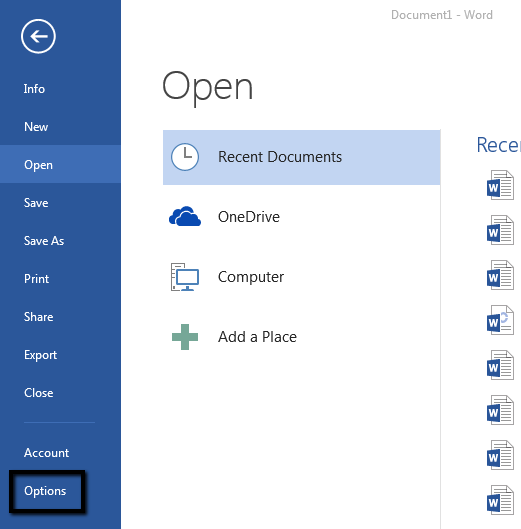
To testify the Developer tab, click "File".

Then click "Options".
In the Give-and-take Options window,
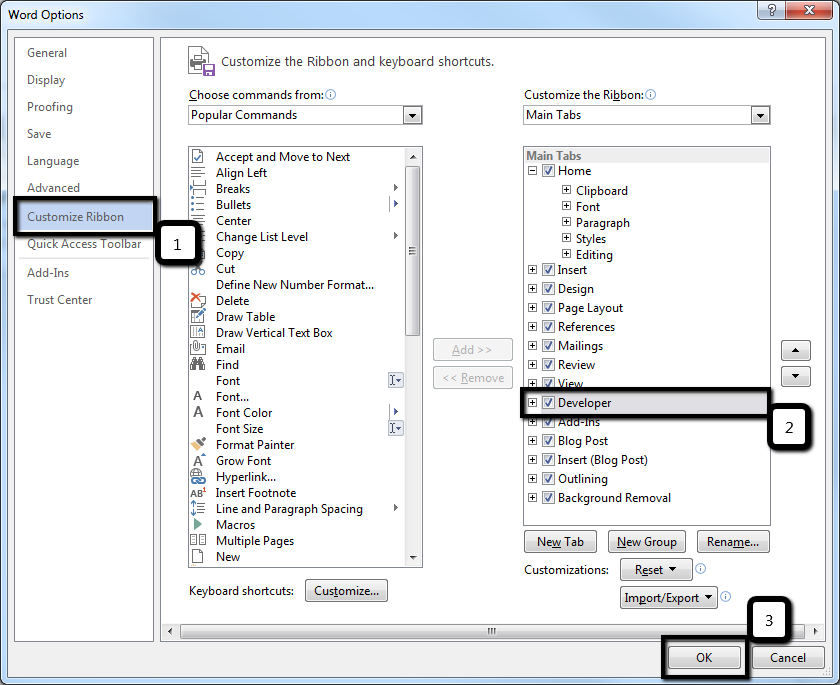
- Click on "Customize Ribbon" in the left-hand sidebar.
- In the Tabs area on the right, cheque the box beside "Developer".
- Click OK.
Adding Class Controls
On the "Programmer" tab 1, in the "Controls" group ii are a number of available form control fields.

Some useful course controls are:
To add together a course command to your template, click in the certificate where you desire the control to get, so click on the icon for the control that you lot want to add together.

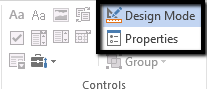
To change the default placeholder text on the control ("Click here to enter text" in the above case) click "Design Mode".
To modify the Properties of the control, click "Backdrop".
Command Backdrop
Each control has options that can be accessed by clicking "Backdrop" with the control you want to modify selected.
For example, this is how you volition add options to a Dropdown Selection Command or specify the date format displayed when using the Engagement Picker Control.
Example #1 — Rich Text Content Control Properties
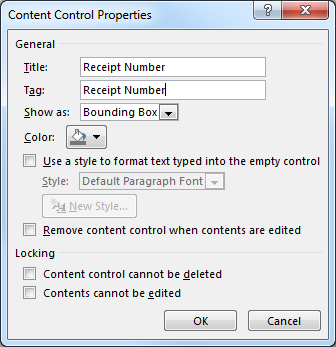 | The instance to the left shows the bones Holding options available to form content controls.
|
Case #two — Combo/Dropdown Selection Control Backdrop
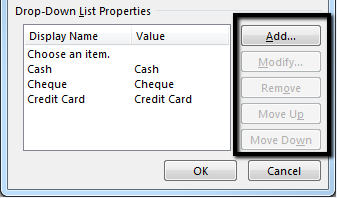 | In addition to the backdrop detailed to a higher place, the Dropdown Listing Control Properties gives you the ability to add options for the user to select from when completing the form. To add a new option to the dropdown control, click the "Add" push. To edit an existing option, click on it then click the "Modify" button. To delete an selection, click on it then click "Remove". |
Example #3 — Date Picker Control Properties
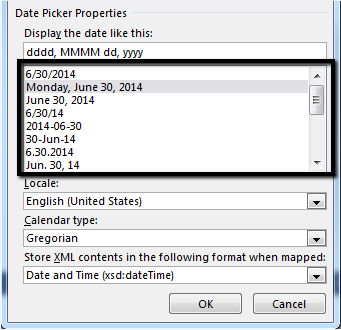 | The Date Picker Control Properties allow y'all to select the format of the date that is displayed when the user selects a twenty-four hour period from the mini calendar. Click on a date format in the selection area to select it, so click OK. |
Formatting Class Controls
Past default, the text that is input into a command volition take the same formatting as the line that it was added to. To change the formatting of the text that is input into the command, highlight the control with "Design Mode" OFF and make formatting adjustments as you would to any other text.
To change the wording or formatting of the control's placeholder text:
- Turn on "Design Mode".
- Highlight the placeholder text and brand formatting adjustments as desired.
- Turn OFF "Design Mode".
When formatting control placeholder text, keep in mind that the default styling of that placeholder may non make it easy to immediately identify every bit a form control. Adding a highlight or some distinctive styling to the placeholder will make it more visible in your document. When the end user types or selects content in the control, the placeholder formatting will disappear and the content will have the styling of that line in your document.
Calculation Editing Restrictions/Protection to Your Template
Protecting your template can ensure that any user or Contact who may exist completing your merged documents will simply be able to modify information that is in the form controls that y'all add together to your template.
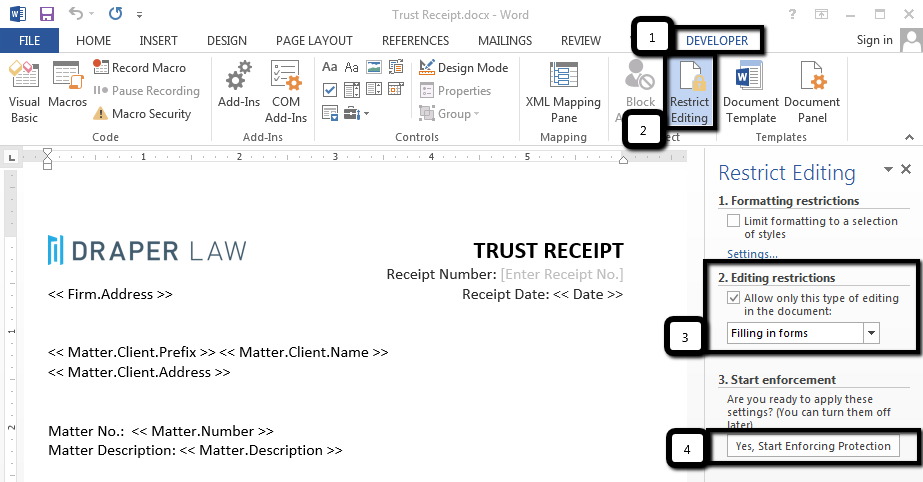
To restrict editing on your template:
- Get to the Programmer tab.
- Click on "Restrict Editing"
- In the Restrict Editing sidebar on the right, check the box nether stride "2. Editing restrictions" and change the dropdown to "Filling in Forms".
- Click "Yes, Commencement Enforcing Protection" nether pace "3. Start enforcement".
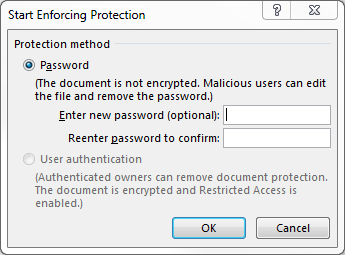
- In the Start Enforcing Protection pop-upward, enter in an optional password if you want the certificate to be password protected, or click OK if you do not want to add countersign protection.
- Salvage the protected template as a new version to ensure that you lot don't overwrite your original document.
Once uploaded to Clio, the protected template volition create new protected Discussion documents while nonetheless pulling information from Clio.
More information is available on Microsoft.com
Advanced Document Automation Webinar
In under an hour, we demonstrate advanced MS Word techniques for adding conditional fields and form controls to your Word template. Nosotros as well demonstrate how to add editing restrictions to your template. This avant-garde webinar is intended for users who are already comfortable with creating Word templates for use in Document Automation.
Click Here to view the recording.

How To Make A Template In Word 2021,
Source: https://support.clio.com/hc/en-us/articles/203359420-Tutorial-Creating-a-Protected-Fillable-Template-in-Microsoft-Word-for-Use-in-Document-Automation
Posted by: bishoplonswellot.blogspot.com
0 Response to "How To Make A Template In Word 2021"
Post a Comment